How to create a new Splash Page ?
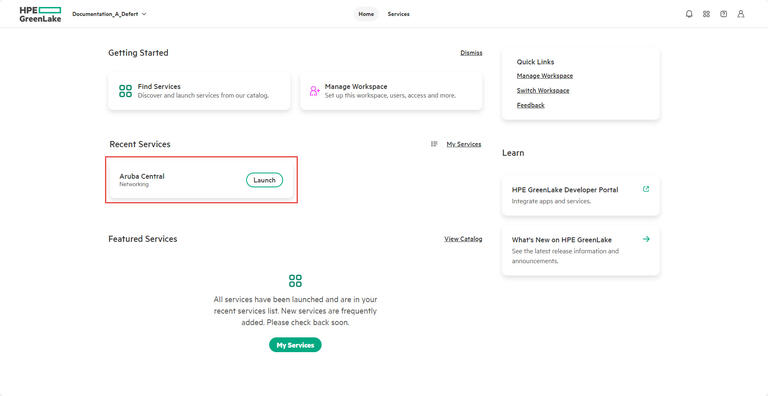
1. Access the Aruba Central portal and launch the app.
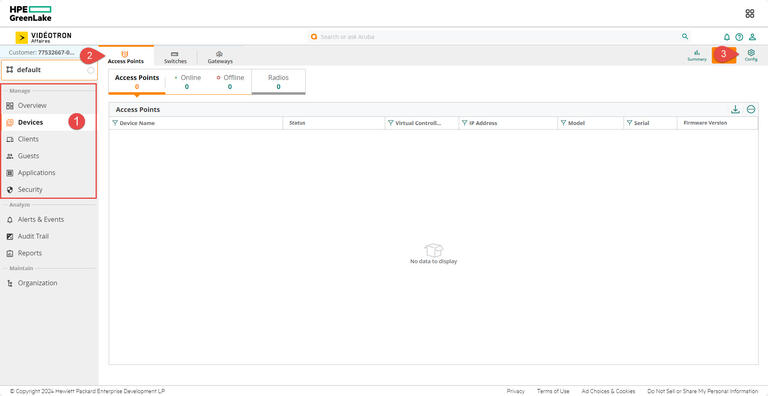
2. Once in the app Central, choose the equipment Group containing the Wi-Fi Access Points, for which you want to create the home page (do not choose the global view nor Default group)
3. In the Manage section on the left, select Guests, then click on the + button in the Splash Pages section.
4. Set up the new Splash Page. Once the setup is complete, click Next.
Name: Enter a unique name to identify the splash profile you wish to create. If you attempt to enter an existing splash profile's name, Aruba Central displays a message stating that a Splash Page with this name already exists.
Type : Configure one of the following authentication methods to provide a secure network access to the guest users and visitors:
- Anonymous: Configure the Anonymous login method if you want to allow guest users to log in to the Splash Page without providing any credentials.
- Authenticated: Configure authentication and authorization attributes, and login credentials that enable users to access the Internet as guests. You can configure an authentication method based on sponsored access and social networking login profiles.
Override Common Name: Select the option and enter in this field the following : login.serviceswifi.com This avoids allow to use a valid certificate and avoids certificate errors during the use of the Splash Page.
Authentication Success Behaviour: This is the page to which your guests will be redirected once the login is complete.
- Redirect to Original URL: When selected, upon successful authentication, the user is redirected to the URL that was originally requested.
- Redirect URL: Specify a redirect URL if you want to override the original request of users and redirect them to another URL.
Session Timeout: This specifies the maximum period of time that a client's session remains active using the format Day(s): Hour(s): Minute(s). The default value is 00:08:00. Once the session expires, users will need to re-authenticate.
Share This Profile: Share your Splash Page profile so you can replicate it with other groups you've set up.
Daily Usage Limit: Use this option to set a data usage limit, whether it's for authenticated guest users, anonymous profiles, or Facebook Wi-Fi connections. By default, there are no daily usage limits. When the configured limit is reached, the user is disconnected from the network until the beginning of the next day, i.e., up to 00 hours in the specified time zone.
To set a daily usage limit, use one of the following options:
- By time : Specify the time limit in hours and minutes on how much data can be used in a day.
- By data : Specify a limit on data usage in megabytes (MB). You can set the limit by selecting one of the following options:
- Per User: This option allows you to limit the use of data based on authenticated user credentials.
- Per Session : This option allows you to limit data usage based on the user's sessions.
- Per Device: This option allows you to limit data usage based on the MAC address of the user's device connected to the network.
URL Allowlist: Corresponds to the domains and URLs that you allow your guests to view. Typically, this option is used to allow guests to view only one site. If you don't indicate any specifics in this list, your guests will have access to any site. It is possible to opt for more comprehensive web filtering when setting up the guest network.
5. Customize the new Splash Page to match your brand identity or vision. Once the customization is complete, click Next.
Layout: Allows you to customize the layout based on the device type. Specify the layout you want by selecting one of the following options:
- Horizontal: Best display for computers
- Vertical: Best display for phones
The horizontal layout is selected by default. To change it, select the type of layout you want from the drop-down list.
Background colour: Select a colour from this palette to change the colour of the Splash Page.
Button colour: Select a colour from this palette to change the colour of the login button.
Header fill colour: Select a colour from this palette to change the fill colour of the Splash Page header.
Page font colour: Select a colour from this palette to change the font colour of the text on the Splash Page. Remember to take into account the contrast of text and background colours so as not to detract from readability.
Logo: To download a logo, click on Browse... and choose the desired image file. Make sure that the size of the chosen image file does not exceed 256 KB.
Alignment: Corresponds to the position of the logo on the new start page.
Background image: To upload a background image, click on Browse... and choose the desired image file. Make sure that the size of the chosen image file does not exceed 512 KB.
Page title: Add a suitable title for the Splash Page.
Welcome text: Enter the welcome text that will be displayed on the Splash Page. Make sure the length of the welcome text does not exceed 20,000 characters.
Terms & Conditions: Specify the terms and conditions to be displayed on the Splash Page. Make sure the length of the welcome text does not exceed 20,000 characters.
The text box also allows you to use HTML tags for text formatting. For example, to highlight italicized text, you can surround it with the HTML tag .
Specify a criterion for accepting the terms and conditions by selecting one of the following options in the Show I agree box section:
- No, accept by default
- Yes, display the I agree box
Ad settings: If you want to display ads on the Splash Page, enter the URL of the page in the Advertising URL section.
To add an ad image, click Browse... and upload the desired image file. Make sure that the size of the chosen image file does not exceed 512 KB.
6. Customize the terms that will be present on your new Splash Page, if desired.
7. Once you have completed the configuration, customization, and localization, click on Preview to view your new page and on Finish to save and complete the creation of your Splash Page. You also have the option to return to the previous steps by clicking on the Back button.
How to enable the Splash Page on a guest network?
1. Once in the Aruba Central app, choose the device group for which you want to create the Splash Page, do not choose the global view.
2. In the Manage section on the left, select Devices. Once on the page, make sure you are in the Access Points category, click on the config. button symbolized by a sprocket in order to access the control panel.
3. Once on the configuration page, click on the pencil next to the Wi-Fi Splash Page network.
4. Once on the network configuration page, stay in the General tab. To make sure the network is activated, click on Advanced Settings and then Miscellaneous.
Make sure the Disable Network option is inactive. If not, turn it off. Click the Save Settings button to confirm your changes.
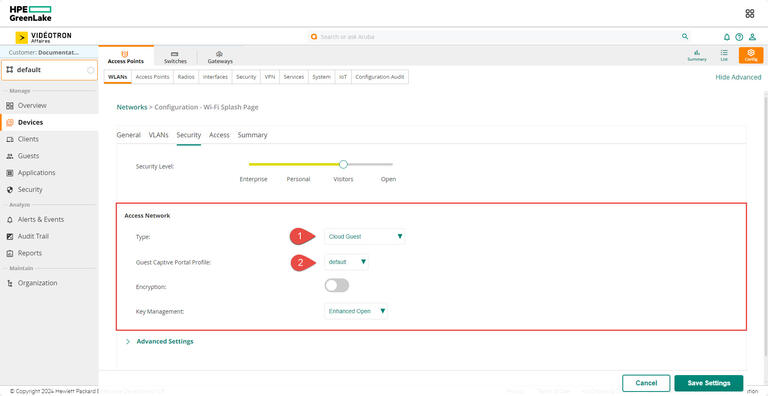
5. Once the network activation is complete, go to the Security tab. Change the Security Level to Visitors.
6. In the Access Network section, select the Cloud Guest portal type and choose the name of the guest Splash Page that you created earlier for the Guest Captive Portal profile. If you want to add an extra layer of security, use Key management: Enhanced Open.
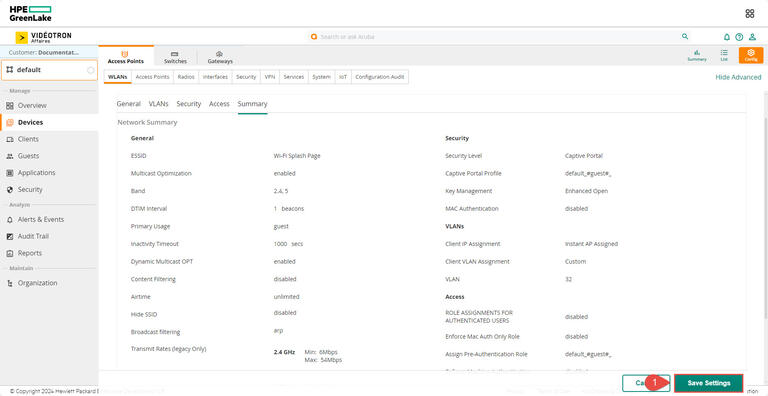
7. Once you've made your changes, click the Save Settings button. You can check the Summary tab to make sure that all entries are correct.
8. Test your new Splash Page.
Still need help?
Customer Service
For any questions about your account or invoice, or to modify or add services.


