Have you chosen to install your Helix equipment yourself?
Watch the videos for easy-to-follow on how to install the Helix Fi gateway, Helix TV terminal and Wi-Fi pods. Setting up your pods takes 10–15 minutes.

Launching the Helix Fi mobile application
Using a tablet or cell phone connected to your Wi-Fi network, follow these steps:
- Make sure BluetoothTM is enabled. It will allow your device to detect the new pod.
- Download the Helix Fi app from Google Play or the App Store if you haven’t already done so.
- Log in to the app with your My Account ID.
- Forgot your username or password? Check out our Connection support page.

Deciding where to put your pods
Each pod must be:
- At least one room away from your Gateway.
- In an area where the Wi-Fi signal is good, but near an area where it’s weak.
- Visible and not obstructed by objects or furniture.
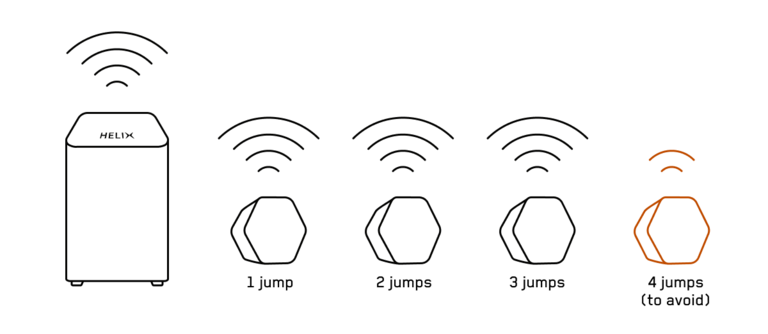
Positioning several pods
- The gateway should be in the middle of all your pods.

- If you need to place a pod close to another to cover your entire home:
- Place the most recent pod closest to the gateway.
- Don’t make more than three jumps between the gateway and the pods, because each jump will reduce signal performance.
In addition to the pods, there are many tips for optimizing your Wi-Fi coverage. Check out our tips!

Installing your pods
Planning to connect a pod with an Ethernet cable? First, activate the pod via Wi-Fi without plugging it in. You can connect it to the cable later, if necessary.
Starting the installation
Note: Throughout the process, keep the mobile device being used to do the installation close to the pod (15–20 cm away).
- Plug a pod into an electrical outlet with the Ethernet port facing down.
- Access the Helix Fi app.
- From the Account tab, under the Devices section, select Activate Helix Fi pods.
- Click Get started.
You’re almost there…
- The light on the pod should be blinking. Wait a minute or two, keeping your mobile device close to the pod.
- When the message Your pod is ready! appears in the app, press Next, then press Plugged in Ready to go!
- Name the pod so you can easily identify it in the app.
Want to install more pods? Press Add another pod at the bottom of the screen and repeat the steps above for each additional pod.
Finishing the setup
Once all your pods have been installed, press Finish setup, then press OK. Installation is complete!
You can now view the status of your pods under the WiFi tab in the View WiFi equipment section.
Good to know
Troubleshooting
Your Wi-Fi pods don’t seem to be working properly? Check out our solutions.


