Not subscribed to Helix? Learn how to connect the illico terminal to your TV.
It is essential that your Helix Fi gateway is installed and configured BEFORE you begin installing the Helix TV terminal. See how to proceed with the Helix Fi gateway installation.

Box contents
Your Helix TV terminal comes with:
- A Voice remote and two AA batteries – Communicates with the terminal and your TV and enables you to send voice commands to the terminal.
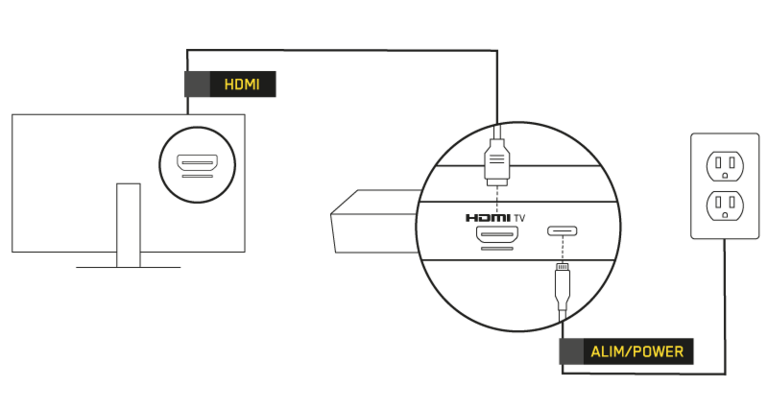
- An HDMI cable – Connects the TV to the terminal.
- A power cord – Connect the device to a power outlet.

Step 1: Connecting the Helix TV terminal
The Helix TV terminal must be connected to the Helix Fi gateway in order to function. It is therefore essential that your gateway is installed and configured BEFORE you begin installing the terminal.
If you don’t have a working Helix Internet connection:
You have to disconnect your old equipment and install the Helix Fi gateway.
Connect the HDMI cable to your HDMI port at the back of the Helix TV terminal and to one of your TV’s HDMI ports. Take note of the HDMI port’s number.
Plug the power supply provided with your Helix TV terminal into the power input at the back of the terminal and then into an electrical outlet without a dimmer or switch.
The terminal’s indicator light will flash to indicate that it’s connecting to your Internet network through your Helix Fi gateway.
Good to know
Helix TV terminal connects to your Internet network through the Helix Fi gateway’s Wi-Fi. Make sure to position your terminal more than four feet from your gateway.
However, if you position your terminal four feet or less from the gateway, we recommend that you connect it directly to the gateway using the Ethernet cable supplied in the Helix Fi gateway’s box, for optimal performance.
To make this physical connection that doesn’t go through the Helix Fi gateway’s Wi-Fi, first connect your terminal’s port and your gateway’s outlet directly with the Ethernet cable, and then connect the power supply. The indicator lights next to the Ethernet port at the back of your gateway will light up.
Bought a Helix TV terminal from a third party?
To ensure that the terminal setup and remote pairing go smoothly, reset both devices and activate the terminal online in My Account.

Step 2: Configuring Helix TV
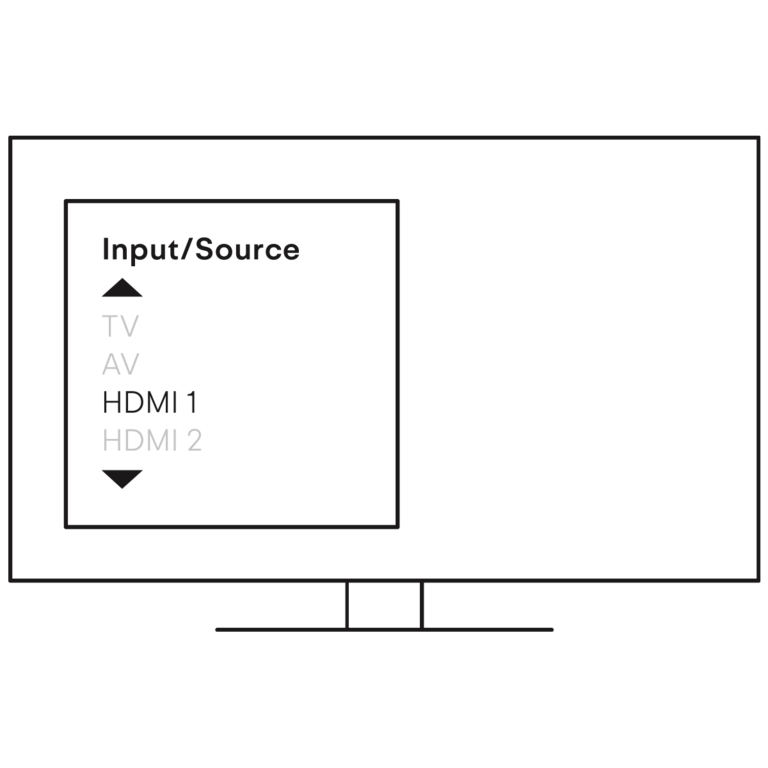
Turn on your TV with its remote and select the HDMI input noted earlier.
Your terminal will automatically connect to the Wi-Fi network. If it does not, follow the instructions on the screen.
Tip: If your terminal is located less than 4 feet (1.20 m) from your gateway, we recommend that you connect it directly using the Ethernet cable supplied in the Helix Fi gateway’s box, for optimal performance.
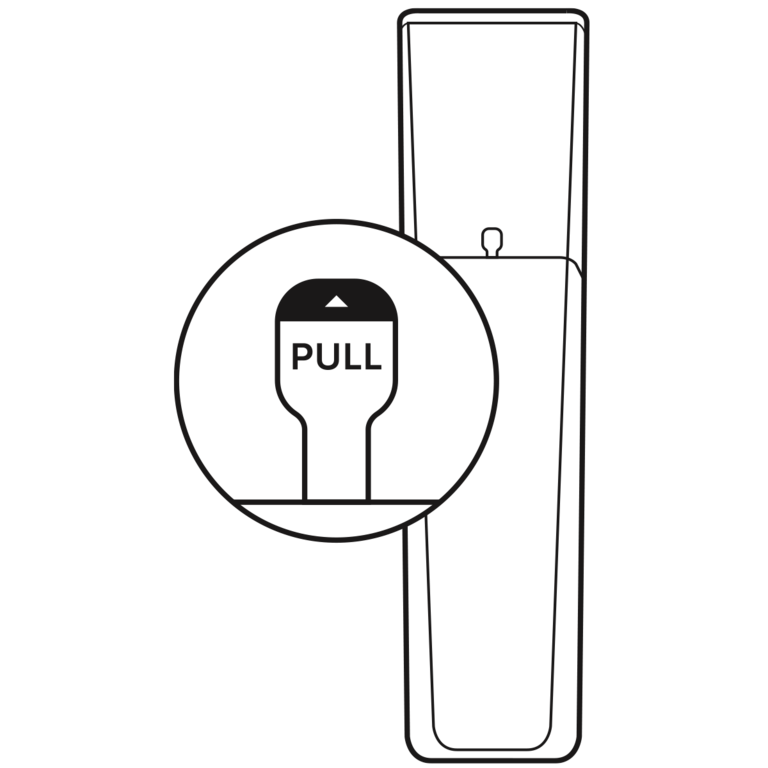
To configure the Helix TV terminal, you will need to use the voice remote provided. Remove the plastic tab at the back of the remote and follow the setup instructions on the screen.
Select the desired language using the navigation arrows on the remote and confirm your selection by pressing the button in the centre of the arrows.
Wait a few minutes while your terminal connects to your Internet network. You will see the login screen for your entertainment environment, as well as other status screens. Select OK when the update is complete.
Name your device so you can easily recognize it when using the Helix Fi app to manage your Wi-Fi network. Choose a name from the list or create a custom name, then select OK to confirm.
Helix will optimize your screen to give you the best HD resolution. Select Yes to confirm the use of these settings.
Good to know
If your terminal does not connect automatically, here are two ways to perform a manual setup. Try the easy and secure WPS connection first.
Connecting using Wi-Fi Protected Setup (WPS)
- Select Connect using Wi-Fi Protected Setup (WPS) on your terminal.
- Then select Initiate Connection.
- Press the WPS buttons under your terminal and your gateway. You have 2 minutes to complete the process.
- Repeat the process, if necessary, or continue your installation.
Manually Adding a Device
- Turn on the Wi-Fi Network Search setting to view accessible networks.
- Select your network and then confirm by pressing OK.
- Enter your network’s password. Important! The system takes into account upper and lower case letters.
- Press Confirm in the window that appears on screen, then continue installing your terminal.
You can easily manage your family’s TV experience with Parental Control and Purchase PIN.
- Using the voice command, say Settings.
- Select Parental Control if you want to restrict access to adult content.
- Select Purchase PIN to prevent unintentional or unexpected purchases.
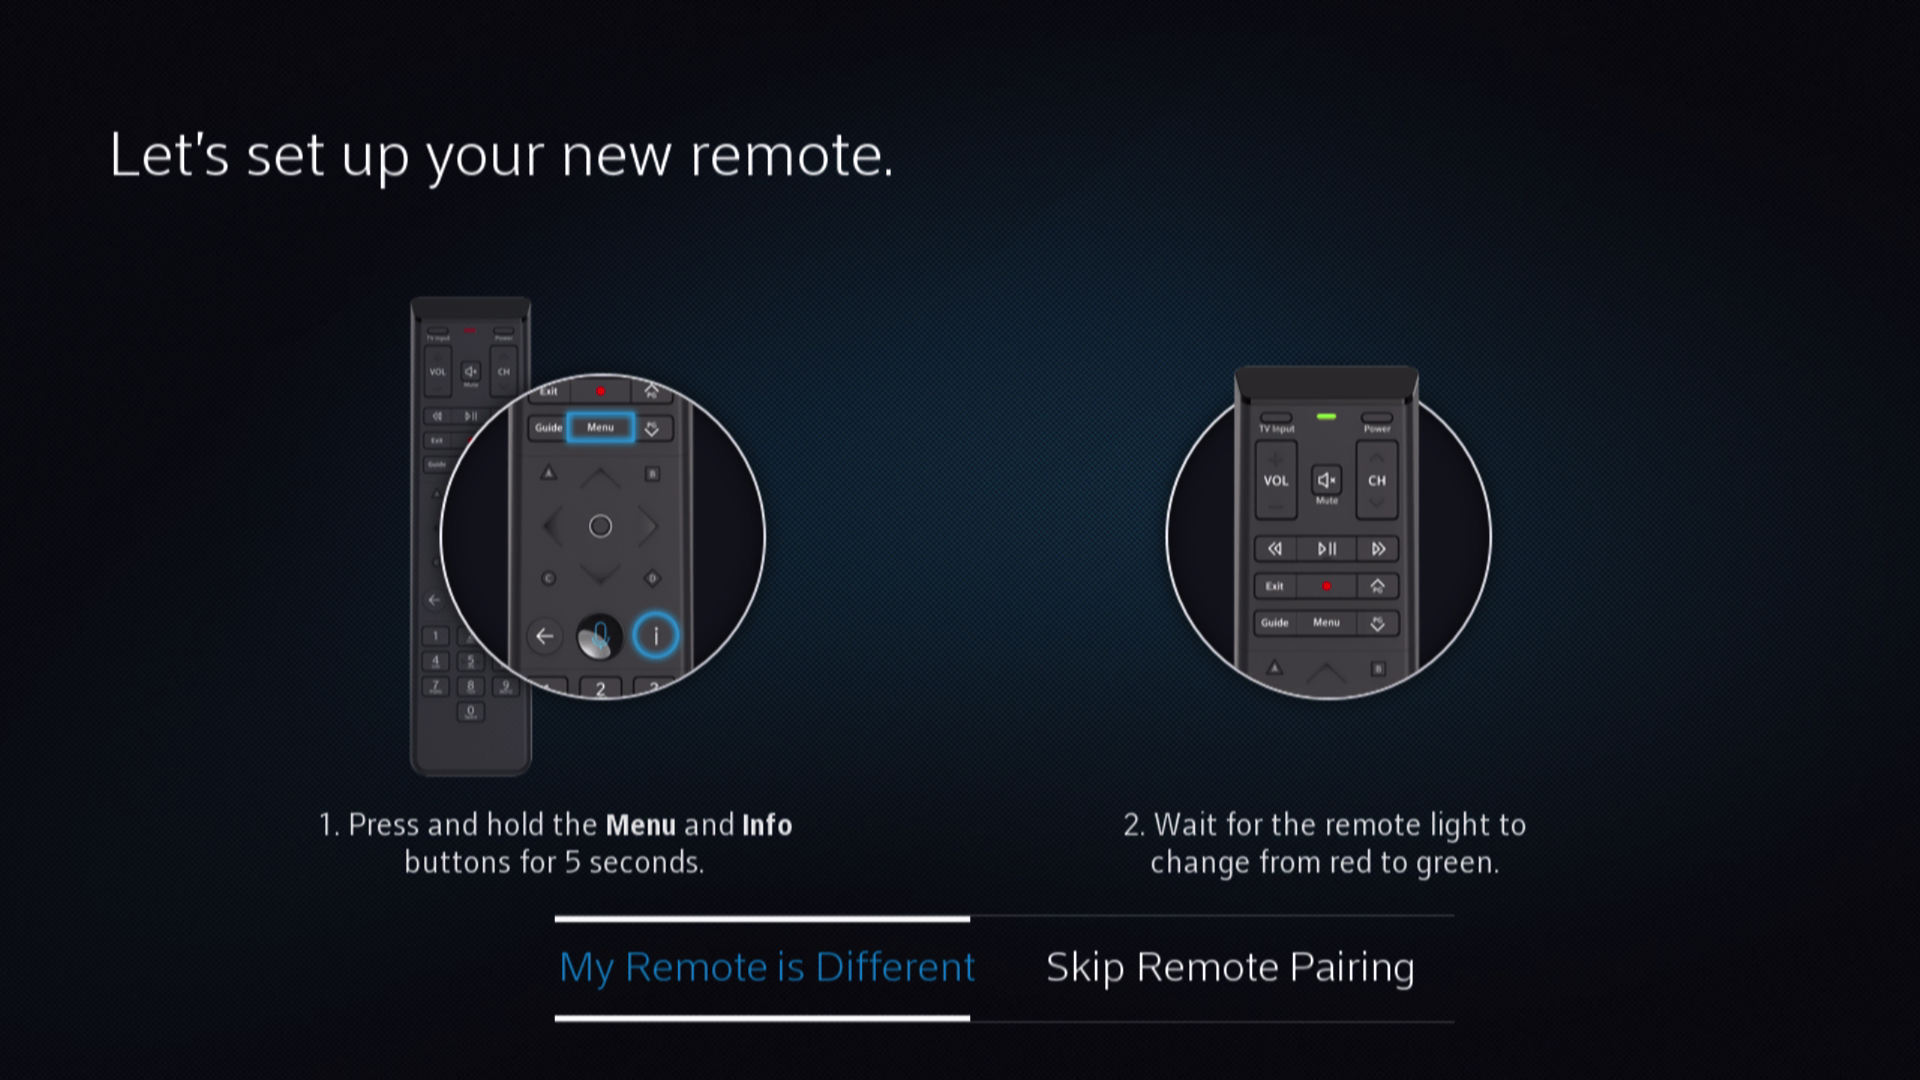
If the voice remote does not pair automatically with the terminal, set it up manually using the on-screen instructions.
Press and hold the Helix and Info buttons until the voice remote’s indicator light changes from red to green. Then enter the three digits that appear on your TV screen.
Your Helix voice remote can control your TV, audio receiver, soundbar and home theatre system.
To control your TV with the voice remote, select Yes and follow the on-screen instructions. To ignore this step and proceed to the next one, select No.
If your TV brand isn’t detected automatically, select it from the list or enter its name by selecting the letters using the remote.
Press and hold the Helix and Mute buttons until the voice remote’s indicator light changes from red to green.
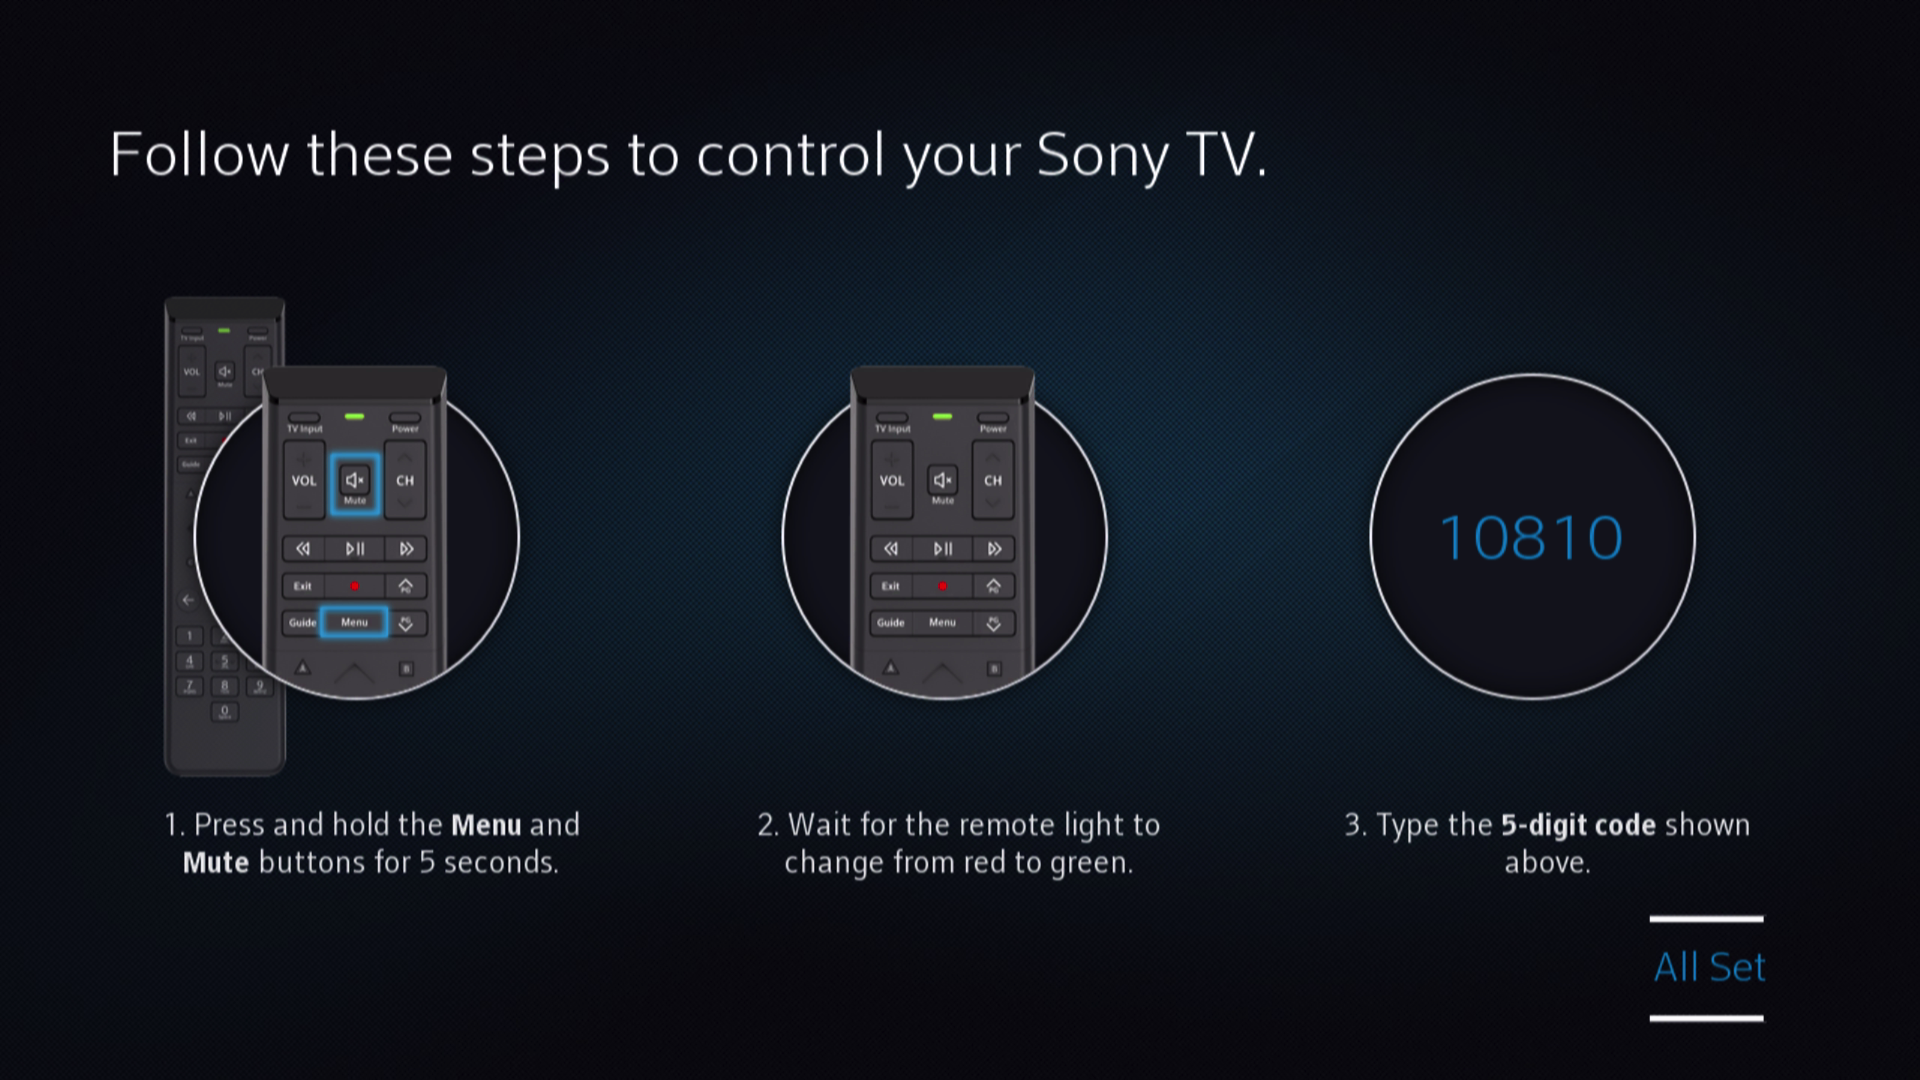
Enter the five-digit code that appears on the screen and press OK. Make sure you enter the numbers in order, as they will not appear on the screen.
Check if the remote controls the volume on the TV. If the volume changes, the remote is paired. You can then select It works. If it didn’t pair, select It doesn’t work to repeat these steps with a new code.
If you wish to control an audio receiver with your voice remote, select Yes and follow the steps, which are similar to the TV pairing process, or select No to ignore this step.
Good job! Your Helix TV terminal is ready to go.
New Helix TV user?
See everything you can do with your Helix equipment in our easy-to-use Starter Guide.

Step 3: Discover voice commands
Now that your terminal is up and running, you should see one of your live TV channels on the screen. Try your new voice command.
For voice commands, press and hold the Microphone button and speak.
For example, say: “TVA” and the TVA channel should appear on your TV.

Try other voice commands to:
Go to channels or programs
“23”
“Léa Olivier”
“Free movies for children”
“On Demand”
Access built-in Helix applications
“Sports”
“Weather”
"Stocks"
Control what you’re watching
“Fast-forward 3 minutes”
“Rewind 30 seconds”
“Subtitles”
You now have a handle on the basic voice commands.
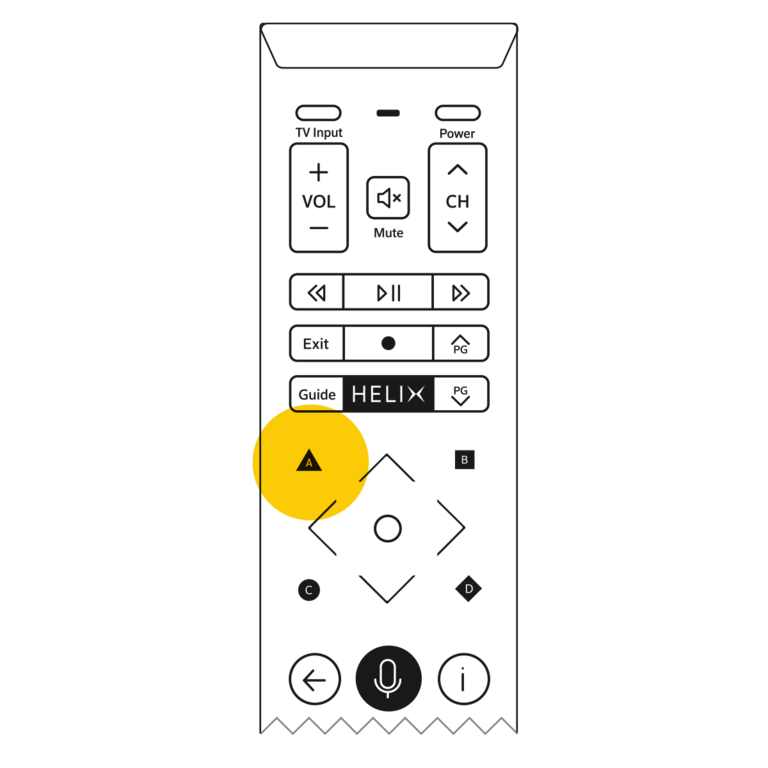
To make the most of your Helix entertainment experience, press the A button on the remote and explore the Tips and Tricks section.
This section features several videos that explain, for example, how to program a recording, watch similar content, play the next episode of a series, etc.
Learn more:
Explore Helix TV’s main features by checking out the Start-up Guide.
If you haven’t selected your channels yet, now is the time to do it.

Do you also wish to...?
If you have another Helix TV terminal to install on another TV in your home, redo the steps starting at section 1.2 Connect the terminal to the TV of this article.
A pixelated image on your TV can be caused by a poor Wi-Fi signal. To check your Wi-Fi signal’s strength on your Helix TV terminal, use voice command and say, “Settings” or access this menu by pressing the ![]() button on the remote and selecting the
button on the remote and selecting the  icon.
icon.
The Wi-Fi signal icon is displayed beside the time and temperature in the top left corner of your TV.
If the icon has only 1 or 2 bars, the Wi-Fi signal may be too weak.
To remedy this, you can connect the Helix TV terminal directly to the Helix Fi gateway with the Ethernet cable provided, if the distance between the two permits.
If they are too far apart, you can ensure your terminal’s connection is good by extending the range of your signal through the addition of Wi-Fi pods.

Having problems?
The Helix TV terminal must be connected to your TV with an HDMI cable that carries the sound and image. If your TV doesn’t have an HDMI port, you can’t use it with Helix.
Black screens can be caused by a cable problem. Check that you used the HDMI cable provided in the Helix TV terminal’s box.
Your TV may also not be tuned to the right input. Select the HDMI input that you have connected the Helix TV terminal to using the TV Input button on the remote (if you have paired it with your TV) or directly on your TV.
First, check that:
- You have removed the plastic tab at the back of the remote
- The batteries are properly inserted into their compartment at the back of the remote
- The remote’s indicator light turns on when you press a button
Still not working? See Troubleshooting issues with your voice remote.
You probably bought a second-hand Helix TV terminal from someone. You need to reset the terminal’s settings so it can be recognized by your Helix Fi gateway.
For the procedure, see Resetting the Helix TV terminal.
Contact us: 1-833-994-3549.


